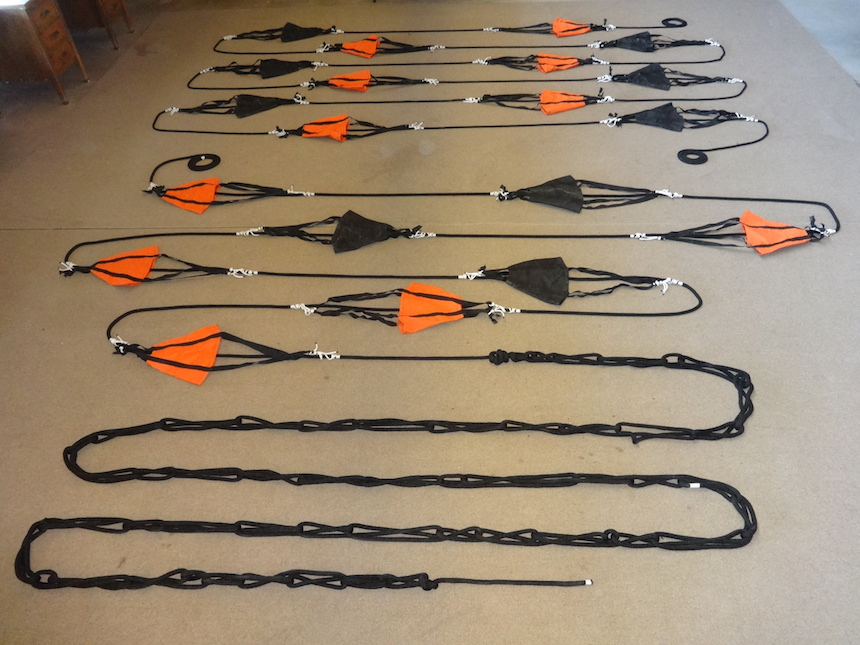
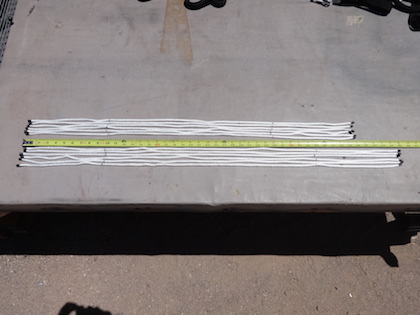
 Series drogue consisting of a total of 20 cones on two separate lines. The line in the foreground has 8 cones and the line in the background has 12 cones. Both lines would be fastened together for use in heavy weather. The 8 cone drogue would be used alone whenever we want to stop or slow the boat for the reasons noted below. |
Note:
This page gets into a lot of minutia and may only be of interest to those interested in making the type of series drogue pictured above.
A series drogue consists of many small fabric cones secured to a long line which is attached to the stern of a boat. The function is to hold the boat stern-to the waves during heavy weather, thus helping to prevent capsize. An important benefit is that the crew can then go below to rest until the storm abates. Series drogues have been called "the sailor's airbag" and for small boats in particular, I consider them an important piece of safety equipment. Having endured heavy weather offshore in small boats, I'm a firm believer in having a pre-rigged drag device that can be deployed to hold the vessel's stern to the seas. The technique of lying stern-to waves rather than bow-to is counter-intuitive. Without going into the dynamics involved, deploying a drag device from the stern of most sailboats will cause them to lie naturally in that configuration, whereas if deployed from the bow, the bow will continually try to fall off.
A series drogue, consisting of multiple drag elements (cones), has several advantages as compared to a more conventional single drogue. One is that the cones will be distributed over a considerable distance behind the vessel, so regardless of wave length, many cones will be providing drag at any given time. Another is that the relatively small size of each cone distributes stress among many cones, reducing the chance of stress failure.
The utility of a series drogue goes well beyond a heavy weather tactic, particularly in the case of very small vessels offshore. It's sometimes useful to stop the boat in order to catch up on rest, to wait for daylight to make landfall, to conduct a repair, etc. For these purposes, a shorter series drogue with fewer cones will serve the purpose and be easier to deploy and retrieve. For this reason, we made our drogue in two sections. The first section has 8 cones on 130' of 5/8" double braid nylon rope. In heavy weather, a second section with 12 cones on 100' of 1/2" rope will be attached to the first section.
The series drogue was developed by Donald Jordan, an aeronautical engineer. Jordan deserves much credit for developing a highly effective storm management system and making the plans for it available to the public. Jordan, who died in 2008, unfortunately did not leave any reports I've been able to find about how he developed the series drogue. As one example, there appears to be no information about how the drogue diameter of 5" was determined. I suspect that it was largely driven by Jordan's desire that the cones be relatively easy to fabricate using a home sewing machine. The small cone size results in minimal stress on each cone during use. As a result, lightweight fabric and tape can be used, as well as a simplified construction process. The downside is that the small size requires the construction of 100 or more cones, a notoriously tedious process.
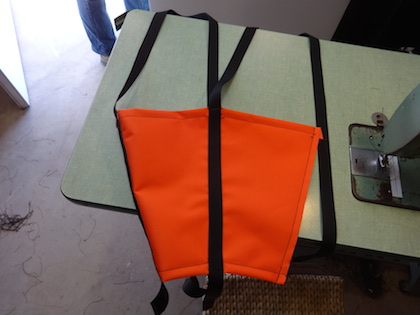
Partly in the interest of avoiding tedium, we made our cones larger. Instead of 100, our drogue has just 20 cones. Each cone is 11" in diameter and is essentially a scaled-up version of the standard 5" cones. Our twenty 11" cones have the same total drag area as a hundred 5" cones. Since our cones are larger, they're subject to higher stresses, so I re-designed them to be inherently stronger and used much stronger materials. Typical 5" diameter cones are made from 2-4 oz. per square yard nylon or polyester fabric. We used 8 oz. polyester cloth for ours. The standard 5" cones are typically secured to the drogue line with three pieces of nylon tape, each with a 200 pound test strength. Our cones are secured with four pieces of nylon webbing, each with a 2000 pound test strength.
In addition to being easier and much quicker to construct, the cost of our drogue was significantly less than a Jordan type series drogue. The total materials cost, including main drogue rope, cloth, webbing, nylon rope and cable ties came to about $275 plus shipping.
We purchased the main drogue line through Amazon from Blue Ox Rope. It's advertised as U.S. made, double braid nylon. Unlike some of the Amazon and Ebay offerings, the breaking strength of the rope was listed, which increased our confidence. For the bridle we used 25' of 5/8" rope. For the first section of drogue line we used 150' of 5/8" rope. For the second section of drogue line we used 100' of 1/2". The total rope cost was about $175 plus shipping. The rope appears to be of good quality and measures the full listed diameter. The individual nylon fibers making up the rope, however, are quite thin, causing them to fuzz up slightly in use. The fineness of the fibers also makes eye splicing somewhat more difficult, as the fibers tend to snag on the slightest roughness on ones fingers, the splicing table or anything else the rope comes into contact with.
The fabric we used is PVC-coated polyester from onlinefabricstore.net. At $3.90 per 60" wide yard, it was a bargain compared to any marine fabric. We used about 5 yards to make 20 drogues, for a total fabric cost of $20 plus shipping.
We also bought 100 yards of 1" flat nylon webbing from countrybrookdesign.com for $33 plus shipping. All sewing was done with V-92 polyester thread.
Below are photos of the drogue construction process.
As noted above, although this cone design is inherently stronger than that used in typical 5" diameter cones, it does present one challenge during the final step in construction. Sewing the last panel seam together closes the cone, which makes sewing the webbing down over that last seam somewhat tricky. This is particularly the case as the sewing machine approaches the narrow end of the cone. It isn't too difficult to do on an 11" diameter cone, but I don't recommend a smaller cone size if using this technique. It's probably reasonable to assume that this challenge influenced Jordan's decision to use a simpler construction. The construction he advocated works well for 5" diameter cones, but isn't strong enough for larger cones.
The bridle will be fastened to dedicated stainless steel plates through-bolted on each side of the transom. The plates are 3/16" thick x 2" wide x 14" long, secured to the hull with 3/8" bolts.
I'll be posting here after we have an opportunity to test the drogue, hopefully not in extreme weather.
--------------------------------------------------------------------------------------------------------------------------------------------------------------------------------------------------------------------------------------------------
Post-voyage comments (updated 10-14-2017):
While we never had occasion to use the drogue, we did test it one night on passage. Winds were in the low to mid 20 knot range with higher gusts. We fastened one end of the 8 cone section to a bridle that was fastened to chain plates on each side of the transom. The other end of the drogue was weighted with a 15 lb. sand bag. Deployment was straightforward and as soon as tension came on the drogue line, the boat was immediately held bow downwind. We had no sail up. The boat rolled considerably throughout the night and we had to wedge ourselves into our bunks more tightly than usual. It was not a restful night. By comparison, heaving to, a technique we occasionally employed to wait out longer lasting squalls, was far more comfortable.
The next morning we were happy to see that none of the icicle hitches that secured the cones to the 1/2" braided nylon drogue line had moved, even slightly.
We did have a concern during the night however, which was that the pitching of the boat might cause the bridle to become caught under the pendulum oar. Thankfully that didn't happen, but afterward we replaced the nylon bridle with another one we had onboard made from 5/8" ultra blue polyolefin, which floats. In addition, we put two styrofoam net floats on the bridle to further insure that it wouldn't get caught under the oar if we ever really needed the drogue.
Back to Sailing home page
Back to omick.net home page
A series drogue consists of many small fabric cones secured to a long line which is attached to the stern of a boat. The function is to hold the boat stern-to the waves during heavy weather, thus helping to prevent capsize. An important benefit is that the crew can then go below to rest until the storm abates. Series drogues have been called "the sailor's airbag" and for small boats in particular, I consider them an important piece of safety equipment. Having endured heavy weather offshore in small boats, I'm a firm believer in having a pre-rigged drag device that can be deployed to hold the vessel's stern to the seas. The technique of lying stern-to waves rather than bow-to is counter-intuitive. Without going into the dynamics involved, deploying a drag device from the stern of most sailboats will cause them to lie naturally in that configuration, whereas if deployed from the bow, the bow will continually try to fall off.
A series drogue, consisting of multiple drag elements (cones), has several advantages as compared to a more conventional single drogue. One is that the cones will be distributed over a considerable distance behind the vessel, so regardless of wave length, many cones will be providing drag at any given time. Another is that the relatively small size of each cone distributes stress among many cones, reducing the chance of stress failure.
The utility of a series drogue goes well beyond a heavy weather tactic, particularly in the case of very small vessels offshore. It's sometimes useful to stop the boat in order to catch up on rest, to wait for daylight to make landfall, to conduct a repair, etc. For these purposes, a shorter series drogue with fewer cones will serve the purpose and be easier to deploy and retrieve. For this reason, we made our drogue in two sections. The first section has 8 cones on 130' of 5/8" double braid nylon rope. In heavy weather, a second section with 12 cones on 100' of 1/2" rope will be attached to the first section.
The series drogue was developed by Donald Jordan, an aeronautical engineer. Jordan deserves much credit for developing a highly effective storm management system and making the plans for it available to the public. Jordan, who died in 2008, unfortunately did not leave any reports I've been able to find about how he developed the series drogue. As one example, there appears to be no information about how the drogue diameter of 5" was determined. I suspect that it was largely driven by Jordan's desire that the cones be relatively easy to fabricate using a home sewing machine. The small cone size results in minimal stress on each cone during use. As a result, lightweight fabric and tape can be used, as well as a simplified construction process. The downside is that the small size requires the construction of 100 or more cones, a notoriously tedious process.
Partly in the interest of avoiding tedium, we made our cones larger. Instead of 100, our drogue has just 20 cones. Each cone is 11" in diameter and is essentially a scaled-up version of the standard 5" cones. Our twenty 11" cones have the same total drag area as a hundred 5" cones. Since our cones are larger, they're subject to higher stresses, so I re-designed them to be inherently stronger and used much stronger materials. Typical 5" diameter cones are made from 2-4 oz. per square yard nylon or polyester fabric. We used 8 oz. polyester cloth for ours. The standard 5" cones are typically secured to the drogue line with three pieces of nylon tape, each with a 200 pound test strength. Our cones are secured with four pieces of nylon webbing, each with a 2000 pound test strength.
In addition to being easier and much quicker to construct, the cost of our drogue was significantly less than a Jordan type series drogue. The total materials cost, including main drogue rope, cloth, webbing, nylon rope and cable ties came to about $275 plus shipping.
We purchased the main drogue line through Amazon from Blue Ox Rope. It's advertised as U.S. made, double braid nylon. Unlike some of the Amazon and Ebay offerings, the breaking strength of the rope was listed, which increased our confidence. For the bridle we used 25' of 5/8" rope. For the first section of drogue line we used 150' of 5/8" rope. For the second section of drogue line we used 100' of 1/2". The total rope cost was about $175 plus shipping. The rope appears to be of good quality and measures the full listed diameter. The individual nylon fibers making up the rope, however, are quite thin, causing them to fuzz up slightly in use. The fineness of the fibers also makes eye splicing somewhat more difficult, as the fibers tend to snag on the slightest roughness on ones fingers, the splicing table or anything else the rope comes into contact with.
The fabric we used is PVC-coated polyester from onlinefabricstore.net. At $3.90 per 60" wide yard, it was a bargain compared to any marine fabric. We used about 5 yards to make 20 drogues, for a total fabric cost of $20 plus shipping.
We also bought 100 yards of 1" flat nylon webbing from countrybrookdesign.com for $33 plus shipping. All sewing was done with V-92 polyester thread.
Below are photos of the drogue construction process.
  First, panels are cut and the edges heat sealed | 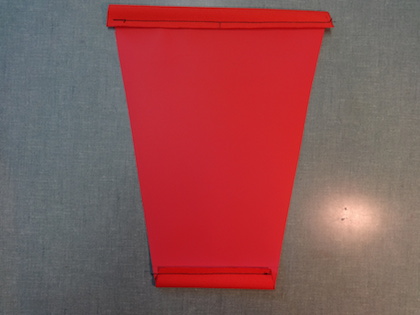 Hems are sewn into top and bottom of each panel |
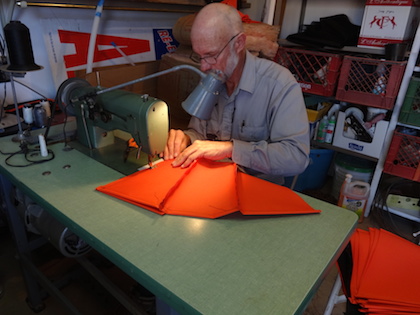 Then panels are sewn together |  Each cone has 4 panels. Seams are on the outside |
  Seams get rubbed down flat |  Then 1" flat nylon webbing is laid over seam on outside. Webbing is cut at 90" long, then marked at 25", 45" and 65". 25" mark is lined up with top of cone. |
  Webbing is sewn onto cone with 2 lines of stitching. Both ends of webbing seams are back stitched. |  Back stitching over webbing |
 After webbing is sewn down over all 3 seams, the cone is folded in half and the last seam is sewn, which closes the cone. |   Sewing down webbing over last seam. This is the only seam that is somewhat tricky, as there's limited room to work when seam gets to the narrow end of the cone. Turning the cone inside out helps. |
 Sewing at the narrow end of drogue where space is tight, but do-able. |  Completed drogue |
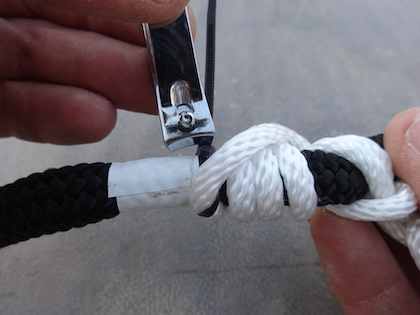
 1/4" braided nylon rope is used to attach drogues to drogue line. 45" lengths of drogue attachment line are about right for fastening to 5/8" diameter drogue line. 40" lengths are good for attaching to 1/2" drogue line. |  White tape is wrapped around drogue line at regular intervals to indicate where each drogue will be attached. I used 7' 6" spacing between drogues. 1/4" line is attached to 5/8" drogue line with an icicle hitch. Practical Sailor magazine rated the icicle hitch the most secure of the gripping hitches. |
 After tying icicle hitch, pass one end of 1/4" line through bight in webbing. Note pink mark indicating center of webbing. This mark should be lined up with black mark on 1/4" line as shown. |  Pull tight, checking that mark on webbing is still in line with black mark on 1/4" line. |
 Tail of 1/4" line is then secured with a double overhand knot. |  Icicle hitch is secured to 5/8" drogue line with cable tie. Tie is tightened with needle nose pliers. Function of tie is only to keep icicle hitch in place during handling. Once deployed, icicle hitch will grip securely to main drogue line. |
 Use nail clippers to trim excess cable tie flush. This results in a smooth end, unlikely to snag on fingers during handling. | 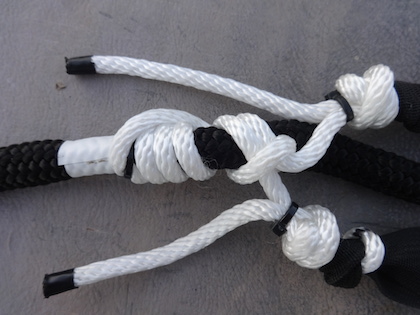 Finished attachment of large end of drogue. Note cable ties beside double overhand knots. |
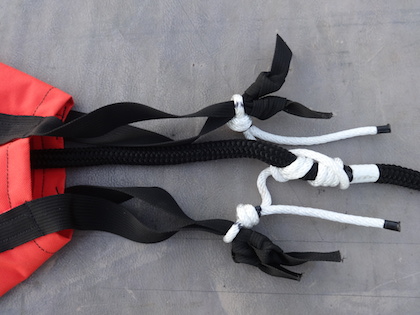 Finished attachment of back (narrow) end of drogue using another icicle hitch. Stopper knots are tied into webbing ends, then a double overhand noose knot is looped around webbing just above stopper knots. Double overhand knots are further secured with cable ties. The location of this icicle hitch on the drogue line is marked with white tape.The distance between the icicle hitches at each end of the drogue is important. There must be enough slack in the webbing to allow the drogue to fully inflate, but not so much that the drogue takes too long to re-inflate with each wave cycle. | 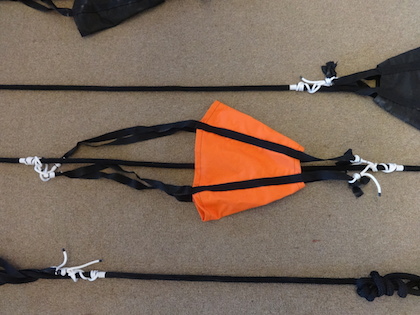 Completed drogue |
As noted above, although this cone design is inherently stronger than that used in typical 5" diameter cones, it does present one challenge during the final step in construction. Sewing the last panel seam together closes the cone, which makes sewing the webbing down over that last seam somewhat tricky. This is particularly the case as the sewing machine approaches the narrow end of the cone. It isn't too difficult to do on an 11" diameter cone, but I don't recommend a smaller cone size if using this technique. It's probably reasonable to assume that this challenge influenced Jordan's decision to use a simpler construction. The construction he advocated works well for 5" diameter cones, but isn't strong enough for larger cones.
The bridle will be fastened to dedicated stainless steel plates through-bolted on each side of the transom. The plates are 3/16" thick x 2" wide x 14" long, secured to the hull with 3/8" bolts.
I'll be posting here after we have an opportunity to test the drogue, hopefully not in extreme weather.
--------------------------------------------------------------------------------------------------------------------------------------------------------------------------------------------------------------------------------------------------
Post-voyage comments (updated 10-14-2017):
While we never had occasion to use the drogue, we did test it one night on passage. Winds were in the low to mid 20 knot range with higher gusts. We fastened one end of the 8 cone section to a bridle that was fastened to chain plates on each side of the transom. The other end of the drogue was weighted with a 15 lb. sand bag. Deployment was straightforward and as soon as tension came on the drogue line, the boat was immediately held bow downwind. We had no sail up. The boat rolled considerably throughout the night and we had to wedge ourselves into our bunks more tightly than usual. It was not a restful night. By comparison, heaving to, a technique we occasionally employed to wait out longer lasting squalls, was far more comfortable.
The next morning we were happy to see that none of the icicle hitches that secured the cones to the 1/2" braided nylon drogue line had moved, even slightly.
We did have a concern during the night however, which was that the pitching of the boat might cause the bridle to become caught under the pendulum oar. Thankfully that didn't happen, but afterward we replaced the nylon bridle with another one we had onboard made from 5/8" ultra blue polyolefin, which floats. In addition, we put two styrofoam net floats on the bridle to further insure that it wouldn't get caught under the oar if we ever really needed the drogue.
Back to Sailing home page
Back to omick.net home page