(Updated 7/26/2022)
see our Salad Garden webpage,
and the Cascabel Community Garden webpage.
In 2022, we did yet another conversion, to a Tire Garden. This is our easiest, most pleasant gardening technique yet.
Oregon
Garden from 2004 to 2014:
We enjoy gardening and also consider it to be one of the most important aspects of our home economy. We've long wanted to have a garden large enough to grow a significant portion of our yearly food needs, not only in terms of vitamins and minerals, but also calories, which is one area in which most gardens fall short.
In the summer of 2004 we finally had an opportunity to put in a large garden on the farm in Oregon's Willamette Valley where we spend May through October of each year. During the past 3 years, this garden has surpassed our expectations about what can be produced in a home garden. Each of the past 3 summers it has yielded an average of 600-700 lbs. of potatoes, 100 lbs. of dry beans, 130 lbs. of tomatoes, 170 lbs. of squash, 100 lbs. of beets, 60 lbs. of green beans as well as onions, melons, salad greens, peppers, eggplant, okra and enough basil to provide fresh pesto daily for several months.
Below is a description of our Oregon garden and why it is laid out as it is:

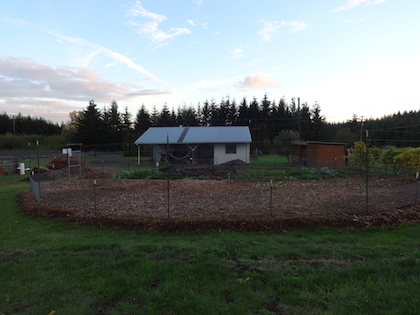
(Above) Oregon garden--early season, 2004
The shape of our garden is unusual in being nearly circular. Friends have referred to it as the "spider web" or "pizza" garden. The shape and size were both determined by the irrigation method. Summer weather in western Oregon is typically dry, so we gave considerable thought to the design of the irrigation system. We knew from past experience that watering a large garden can be quite time-consuming , so we wanted the irrigation to be relatively simple and convenient to use. For that reason we decided against hand watering. We investigated drip irrigation, but found that drip tape, the only reasonably cost-effective type of drip irrigation for a large garden, has a limited life expectancy and is not readily recyclable, so we decided against that. We then looked at overhead sprinklers and found that conventional impact sprinklers were not very efficient in terms of applying water evenly (substantially more water ends up in the center of the irrigated circle than in the outer part). Eventually, we discovered rotary sprinklers which are more efficient at applying water relatively evenly throughout the circle. The circular sprinkler pattern then determined the garden layout.
Although these sprinklers irrigate in a circular pattern, we made our garden 12 sided to simplify the fencing. The garden is about 65 feet in diameter and is divided into 12 pie-shaped sections. The rotary sprinklers are in the center of the garden. We grow crops in each section that have similar water needs since the sprinklers can be adjusted to water individual sections. The garden and the irrigation method have been very successful. We've never had a garden in which irrigation was as easy. At the end of this page is a technical description of the irrigation system for those who may be interested in trying it.

(Above) Irrigating garden--mid-summer 2005
We wanted a garden in which we could do all the work using only hand tools, since we prefer their simplicity, reliability, lack of noise and the exercise they provide. Since the soil in this part of the Willamette Valley is fairly heavy, with a high clay content, we added amendments to make it lighter, more friable and easily worked with hand tools. We had 30 cubic yards of sand trucked in (a well spent $300), and, since we have horse stables next door, we also brought in about 100 cubic yards of composted horse manure/sawdust mix. This was spread out and formed a 3" deep layer of sand and a 9" layer of manure which was tilled in with a small tractor at the beginning of the first summer. Since then we have done all the gardening using a shovel, hoe and rake.
The resulting garden soil is a joy to work in. Although the garden is 3200 square feet in area, working the friable soil by hand is a pleasant task. We till the garden beds using a round-pointed shovel to aerate and loosen the soil without lifting or turning it. Our technique is to bury the shovel blade and rock the handle back, then move the shovel back about 4-6" and repeat until all the soil in the bed is loosened. It's a rhythmic, back-saving motion.
In 2006, we dispensed with the shovel and prepared the beds for planting using just a hoe to loosen up the top 4-5 inches of soil. This was even easier than using the shovel and caused less disturbance to earthworms, which is important to us as they are valuable soil conditioning allies.
Each of the beds in the garden is about 30 inches wide and all the paths are about 12 inches wide. The bed width allows us to straddle the beds during planting. We keep the paths narrow to minimize their area, since they get watered and must be weeded just like the beds. By using a well sharpened hoe and cutting weeds while they're still small, we usually spend only about an hour or so each week weeding.
In order to insure that the soil in the beds remains uncompacted and easy to work, we layout the paths and beds in the same location year after year. To do this, we lay out the beds one pie-shaped section at a time, using 2 guide strings that are stretched from the the center of the garden out to fence posts at the perimeter. Marks on the strings indicate the location of each path. When we begin to till the garden in spring, we lay out the paths by sighting from a mark on one string to the corresponding mark on the other string. When one section is finished, we move the strings to the next section and repeat the process.

(Above) Irrigation manifold and rotary sprinklers at center of garden. Sprinklers are mounted on a homemade manifold with valves that allow us to use either 1 sprinkler, 2 sprinklers or all 3 sprinklers at once. Note layout strings and also the hose bibb which is used to fill a sprinkling can for occasional hand watering of newly planted beds.

(Above) View of one section from center of garden--mid-summer 2005. Crops in this section include lettuce, onions, bush beans, peppers and tomatoes with buckwheat cover crop in the section on the right. Note layout strings.
Irrigation
No irrigation system is perfect, and this one has a couple of limitations which need to be accommodated.
First, as with all overhead irrigation, the sprinklers are very wind sensitive. We try to irrigate when the air is calm, usually first thing in the morning. Note in the above photos that we use 3 sprinklers at the center of the garden. Although the garden could be irrigated using just one sprinkler, we live in an area that is frequently breezy during summer, so irrigation must be done during brief calm periods early in the morning. Using 3 sprinklers allows the irrigation to be done in 1/3 the time required for a single sprinkler. In less windy areas, one sprinkler would work fine, it would just need to run longer.
Second, the sprinklers need to have steady water pressure in order to evenly irrigate a circle of a particular diameter. As water pressure drops, the diameter of the irrigated circle gets smaller and vice versa as pressure increases. If the sprinklers are connected to a municipal water supply, this doesn't present a problem. We irrigate from a well which, like most residential wells, incorporates a pressure tank and pressure switch. When the sprinkler is turned on, the water pressure drops steadily as the pressure tank discharges down to about 40 pounds per square inch (psi). At that point, the pressure switch turns on the well pump which pressurizes the tank back up to 60 psi, at which point the pump shuts off and the cycle starts over. As the water pressure continually varies between 40 and 60 psi, the irrigated circle fluctuates in size resulting in uneven application of water at the perimeter of the garden. This could be solved by by installing a pressure regulator to maintain steady pressure to the sprinklers. The problem is that most of the wear on a well pump occurs during startup. A pressure regulator would require the pump to cycle on and off during the entire irrigation period, causing unnecessary wear to an expensive pump.
I researched this and eventually solved the problem by installing a device that most plumbers have never heard of. It's called a "cycle stop" valve, and solves both problems. It is similar in principle to a pressure regulator, and is installed between the pump and the pressure switch. It insures that the pump delivers a constant water pressure to the sprinklers and also insures that the water pressure at the switch does not become high enough to turn the pump off, until the sprinklers are turned off, thus prolonging pump life. In the event that you might want to use such a system, I'd recommend reading the Cycle Stop Valve website at cyclestopvalves.com. (Note: I am not connected with this company and do not receive any compensation from it.)

(Above) Cycle stop valve is red and white fitting. Well head is on left.
The sprinkler heads we use are Rain Bird #5004 PC which are adjustable for irrigating any portion of the garden from one section (1/12th) up to the whole garden. They come with an assortment of nozzles depending on the area to be irrigated.
2013 Update:
We continue to enjoy abundant produce from our Oregon garden and for the past several years have shared it with our friends and neighbors Michael and Pamela.
In Cascabel, Arizona, where we spend half the year (winter), we put in a much larger community garden in the spring of 2005. In 2012, the community garden was moved to a new and permanent site. For more information, see the Cascabel
Community Garden webpage.
For the 2015 season, we made a radical change to our Oregon garden. Just before leaving Oregon in the fall of 2014, we decided to try deep mulching. In previous gardens we'd tried this using straw, but that led to an explosion of sow bugs which ate just about every plant that emerged from the ground. Nonetheless, having seen several videos on the benefits of deep mulch gardening using wood chips, we decided to give it a try. We put out the word to a local company that trims trees around power lines, as well as among local arborists. We had a convenient place for them to turn around and soon were getting truck loads of chips. We first covered the garden with a 3" layer of composted horse manure, then 8" of chips.
When we returned in the spring of 2015, there wasn't a weed to be seen in the garden, a very pleasant first. Working the soil was greatly reduced as it only needed to be done right where we were planting. We just raked back the chips, loosened the top-most layer of soil and planted. Soon, we had another pleasant surprise, which was a major reduction in watering. The plants grew well and there was little weeding to do during the summer. Even in late summer, we could dig down through the mulch to very damp soil, despite having had a typically dry summer. So far, we're pretty well sold on deep wood chip mulch gardening.
 In the fall of 2014, we put down feed sacks under the garden fence before mulching to be extra sure weeds didn't come up there. |
 Then we put down a 3" thick layer of composted horse manure over the entire garden, followed by a 6-8" thick layer of wood chips. |
 In the spring of 2015 we arrived back in Oregon to find no weeds. We raked back the chips to expose soil for planting. Little watering was needed during the growing season. |
 In fact, water use was reduced to the point that we replaced our previous sprinkler irrigation system with a watering wand. |
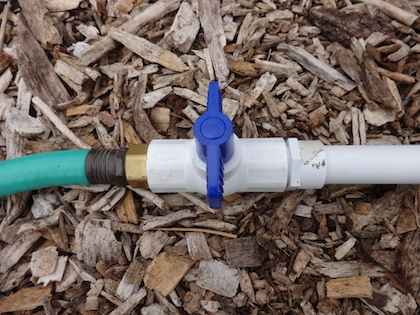 Wand is made from PVC pipe with a ball valve at the hose end. |
 At discharge end of watering wand is a 45 degree fitting and a quick-disconnect to a watering rose. |
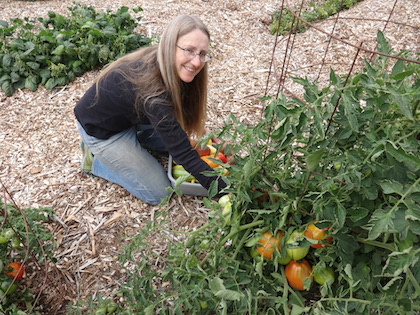 A contented gardener |
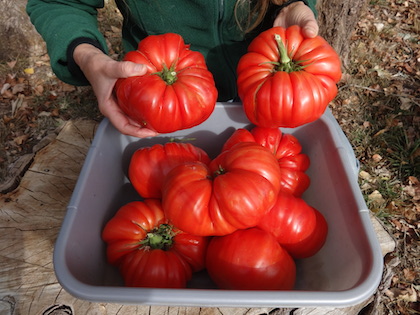 An amazing harvest |
2022 Update: Conversion to Tire Garden
After 6 years of wood chip gardening, we began to discover some drawbacks. One was that early spring planting was challenging due to wet soil. Another was that thistles thrived in the wood chip mulch. With deep roots, it didn't matter how many times we pulled them up, enough root was left that they would spring back up within a few weeks. Finally, we were discovering that getting wood chips was increasingly difficult as more and more gardeners and landscapers began requesting chips from arborists. With fewer chips available, weeds more easily grew up through the mulch and thistels grew up through the mulch, no matter how thick it was. Even on the chip piles, thistles grew up through 2-3 feet deep chips. It was time for a change.
We then decided to try a form of tire gardening that eliminated all weeds, minimized the quantity of chips needed and allowed early spring planting.
Recommended reading for Oregon gardening:
Growing Vegetables West of the Cascades, by Steve Solomon, 5th Edition, 2000
This is the most comprehensive book we've found on gardening in the Pacific Northwest.