Our Current Composting Toilet System
|
(Page updated 9/26/10) For additional information, see our other composting toilet web pages:
-Barrel Composting Toilet
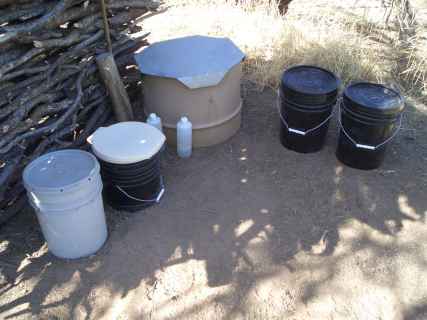
For the past 5 years we have been developing a composting toilet design that is simple, inexpensive and easy to replicate, yet also meets most of the design considerations addressed on our Composting Toilet Regulations page. The system is constructed of 5 gallon buckets and 55 gallon plastic barrels. Most of the materials can be purchased at a hardware store and the cost of the system is about $250. The system features vector control, zero leachate discharge to native soil, aeration and moisture control of the compost and construction of durable, non-corrosive materials. Although the system is designed for use in mild climates, we've used it in places as diverse as Arizona and Oregon. The reason for use in mild climates is that the composting chambers are outdoors and sufficient warm weather is needed during the year for proper composting to take place. An approximate guide to appropriate climates for this system is USDA Plant Hardiness Zones 8 or higher. It the barrels were located in a garage or other building protected from temperature extremes, it would probably work fine in colder climates. This system requires occasionally emptying buckets containing fecal matter and is therefore not for the fecophobic. However, it is not the smelly, objectionable process that one might imagine it to be. The buckets contain mostly odorless cover material and the process requires only about 15 minutes every 10 days or so. I believe this system performs as well as any certified composting toilet in terms of pathogen and nitrogen levels despite its simple design. Unfortunately, it is doubtful, given the current regulatory climate, that it could be permitted. Regulators are typically cautious about what they will grant permits for and most feel that a toilet system requiring manual emptying of buckets containing feces into a composting chamber involves too much risk of contamination. Obviously, preventing communicable disease should be taken seriously. On the other hand, it's not nuclear waste that is being handled. Indeed, it is difficult to see how the risk of contamination during routine maintenance of a bucket toilet system differs significantly from cleaning oneself after defecation. In either case a similar risk of contamination exists requiring similar precautions (especially hand washing). I know of many people (including a medical doctor) who have been using bucket toilet systems for many years without problems. Hopefully, the perspectives of regulators will change as bucket toilet users accrue more evidence of the relative safety of such systems. It should be noted that this particular design could also be modified to function without the bucket aspect by fitting a toilet seat and vent directly on top of the barrel composting chambers. With this modification a permit might be granted for the system in some jurisdictions. For more information on this, see our Barrel Toilet webpage. In the bucket version of the system, which is what we use, separate 5 gallon buckets are used for defecation and urination. Buckets containing feces and cover material are periodically emptied into composting chambers made from 55 gallon plastic barrels. Urine, which is collected in a separate bucket, is diluted with water and emptied daily into mulch basins around trees and shrubs. The number of buckets and barrels used is flexible and is based on the number of people using the system. Composting toilets address only one aspect of the wastewater flow. For a description of our current blackwater and graywater systems, see our Water Reuse page. Following is a description of the composting toilet system components and processes:
Toilet: We use three 5 gallon plastic buckets as toilet buckets. Each bucket has a gasketed, leak-proof lid and is purchased from hardware stores for about $6, including lid. The toilet buckets are used primarily for defecation, although the system accommodates urination that occurs during defecation. As the photos below show, the toilet buckets can be located either outdoors in remote locations or indoors in urban settings. When a toilet bucket is about 2/3-3/4 full, a lid is snapped on, the bucket is removed and a clean bucket with a few cups of cover material in the bottom is put in its place. A bucket containing cover material sits conveniently beside the toilet (more on this below). Enough cover material is used to completely cover feces and toilet paper after each use (typically 3 to 6 cups per use). We keep a 1 qt. plastic bottle with squirt cap next to the toilet for moistening toilet paper after use. This reduces the volume of the toilet paper and allows the toilet paper to be covered using less cover material. With 2 adults using the system, it takes about 10 days to fill all 3 toilet buckets. The buckets are then emptied into an outdoor composting chamber constructed from a 55 gallon barrel. The compost in the barrel is manually aerated each time buckets are emptied. A separate 5 gallon bucket with lid is used for urination only. The urine bucket is emptied on a daily basis, either full strength onto a compost pile to provide extra nitrogen, or diluted with at least 8 parts water to 1 part urine and emptied into mulch basins around shrubs or trees as described on our Water Reuse page. The bucket is then rinsed and returned to the bathroom area.
Outdoor toilet version: Our outdoor toilet in Arizona is located behind a privacy screen of mesquite branches. The toilet was constructed by cutting a 5 gallon bucket in half to make a base and a top for the toilet bucket. The bottom 8 inches of the cut bucket serves as a base to stabilize the toilet bucket while in use. The base is buried in the ground about 6" deep. A couple inches of sand are put into the bottom of the base to help prevent the toilet bucket from becoming stuck in the base. A plastic toilet seat/lid, available from camping supply stores for about $5, is snapped onto the top portion of the cut bucket. This makes a seat assembly which is inserted into the toilet bucket. The function of the seat assembly is to keep the bottom of the toilet user several inches higher above the toilet bucket contents, which allows the toilet bucket to be filled somewhat fuller before it needs to be replaced. This outdoor toilet has no roof. If it rains, we use an umbrella. It's really quite pleasant.
Indoor toilet version: Our indoor toilet in Oregon consists of a 5 gallon bucket inside a wooden cabinet with hinged lid. The cabinet is made from 3/4 inch plywood. The cabinet has no bottom.
Cover material: In Arizona, we use mesquite duff (dry and partially decomposed leaves) which are raked up from under large mesquite trees. This is passed through a 1/2 inch hardware cloth to separate out twigs and other debris. We take care to rake up as little dirt as possible with the duff. In Oregon, we have been using purchased wood planer shavings for cover material (these contain no treated wood shavings). The wood shavings are clean and pleasant to use, but take a long time to decompose, so we're considering switching to shredded leaves.
Composting chambers: The composting chambers are constructed from food grade, polyethylene barrels purchased in nearly new condition (used one time only). They are purchased from bakeries for about $15 apiece. The top of the barrel is cut out about 1 inch in from the edge using a power sabre saw. The barrel is then painted a dark color using oil based paint. This protects the barrel from UV deterioration and helps with heat absorption from sunlight. The barrels should be located outdoors and in a sunny location. In windy locations, the barrels could be secured by driving several 1/2 inch diameter by 4 foot long stakes made of rebar into the ground around each barrel. There are no holes in the bottom of the barrel since this is designed as a zero discharge system, meaning that all liquid (leachate) remains in the barrel, where it eventually evaporates. The leachate includes the small amount of urine excreted during defecation as well as the small amount of water used in bucket cleaning. For insect vector control, a 3 foot diameter piece of fiberglass screen or insect netting is secured around barrel tops using a piece of 1/8 inch nylon cord about 7 feet long and a spring. The cord is adjusted so that the spring provides a light tension, yet allows the cord to be removed and replaced quickly and easily. For animal vector control and to prevent rainwater from entering, each barrel is covered with a lid of galvanized corrugated roofing 26 inches square. The corrugations permit airflow to the compost. The lids are secured with masonry blocks. Barrels are filled to within about 6 inches of the top. One barrel is filled at a time and a sufficient number of barrels are used to allow feces to compost for a minimum of 1 year to help insure pathogen destruction. For example, in full time use, 2 people will fill one 55 gallon chamber in about 2 months. So, if 2 people are using the system, 6 barrels are required.
Emptying buckets: Toilet buckets are emptied when all 3 buckets are full. 1 qt. plastic bottles with squirt caps are filled with water and used to rinse buckets. One bottle is used for cleaning each bucket although only half or less of each bottle is used. To prevent contamination from spray, pressurized water from hose or other source should not be used. Emptying and cleaning 3 buckets takes about 15 minutes. Hand washing is the final and most important step in the process.
Aerating compost: Since the composting barrels have no air vents or leachate drain, thorough aeration, moisture control and mixing of the compost are particularly important. In the process of experimenting with this system, we tried a variety of manual compost aerators without success. Finally we discovered the Compost Crank. This well designed tool is made of stainless steel and works far better than any other aerator we've tried. Although we don't have long experience with the Compost Crank, it is already obvious to us that it is essential to the success of this system. What the Compost Crank does is to pull wet material up from the bottom of the composting chamber, effectively aerating the compost and distributing moisture in the process. Temperature and visual inspection of compost indicate good breakdown. The Compost Crank costs about $35. (Note: We have no financial connection with the manufacturer of this tool). The tool is cranked into the compost until the spiral end contacts the bottom of the barrel. Without further cranking, the tool is then pulled straight up until the spiral end reaches the surface of the compost. The process is then repeated in another part of the compost until all compost is thoroughly mixed and aerated. The Crank is stored in a length of 4" plastic pipe when not in use. The final and most important part of the aeration process is hand washing. The aeration process is done each time buckets are emptied.
Emptying compost chambers: After 4 months of composting (since the last bucket was emptied into it) the contents of a compost barrel are emptied into a wheelbarrow using a shovel. We lay an old sheet down first and then place a screen of 1/2" hardware cloth on top of the wheelbarrow. Any compost that will not pass through the hardware cloth is dumped onto the sheet (typically, there are a few gallons of material that don't pass through the screen). When the barrel is nearly empty, it can be turned upside down to empty the last bit of compost. The sheet is then gathered up and the larger pieces of compost are dumped back into the barrel for another 4 months of composting. The barrel is then ready to be filled again and the cycle is repeated. The screened compost compost makes excellent mulch/fertilizer around trees and shrubs. We also use it as the the growing medium in our salad garden, but in that application, we further age it for a minimum of a year before using.
Statistics: Here are some technical details we've observed during the past 2 years: -cover material use is 3 to 6 cups of cover material per person per day (although this is more than necessary for composting, we prefer to thoroughly cover all deposits) -for 2 people in full time use, a 5 gallon bucket will be filled to 2/3 to 3/4 full in about 3-4 days -for 2 people in full time use, one 55 gallon barrel will be filled in about two months -for 2 people in full time use, about 1 to 1 1/2 gallons of urine per day will accumulate in the urine bucket -as average ambient temperatures vary from 50 to 80 degrees F from winter to summer, temperatures at center of compost range from 60 to 110 degrees F
2009 Update: We have been using this composting toilet method on a full time basis for the past 3 years. It has met its design goals of simplicity, low cost and ease of replication. We find the system safe and easy to use and the temperature and visual appearance of the compost indicate good decomposition. We also recently added an insect trap to the system after occasionally experiencing flies in the compost barrels. Constructing and installing the insect trap is described in detail below. (More information on insect traps can be seen on our other composting toilet pages.)
|
||||||||||||||||||||||||||||||||||||||