Deck,
Cabin and Hull Work
(Posted
10/18/2016)
(See bottom of this page for post-voyage updates)
After
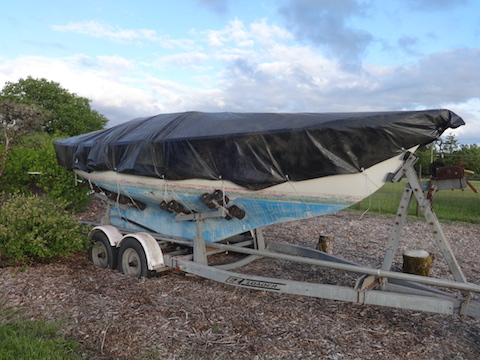
we bought Minimus (not her name at the time) in September of 2015, we tarped her for the winter and headed south to Arizona. In early June of 2016, we were back in Oregon and began a summer's worth of work to make her ocean worthy.
| Minimus
tarped for the winter
|
Before
describing the specifics of the deck, cabin and hull work though, we should mention three aspects of the boat work that so far we're sold on.
Latex
Paint:
We used latex paint on the deck, hull and cabin interior, since the
advantages over oil paint are considerable. Drying time is greatly reduced, it smells better and is easier to work with. Cleanup is much easier and so are touch-ups. The deck was painted with semi-gloss acrylic latex paint, applied mostly with a foam roller. After a summer's worth of traffic while working on the boat, the deck paint still looks great.
We'll
be reporting on its performance as our trip proceeds during 2017, but so far we're impressed.

We used Valspar semi-gloss latex paint from Lowes for the deck and cabin.
When the weather was hot and dry, we added Floetrol to help it flow better.
| 
We used Sherwin Williams Infinity semi-gloss paint for the hull and some of
the exterior wood work. Here we're painting over teak, as we don't want to
spend our sailing time keeping up with varnishing or oiling wood.
|
MDO Plywood:
MDO stands for medium density overlay. It's a high quality, void-free plywood covered on both sides with a smooth, weather-proof surface. It was developed for highway signs, to stand up in all weather, year round. We special ordered two 4' x 8' sheets of 1/2" MDO from a local lumber yard for about $60 per sheet. It's surprising it's not more commonly used in boat work, as it doesn't require fiberglassing to prevent surface checking and is cheaper than marine ply. We used it throughout the boat, for reinforcing hatches, building the counter in the cabin, parts of the self steering gear, etc. Butyl
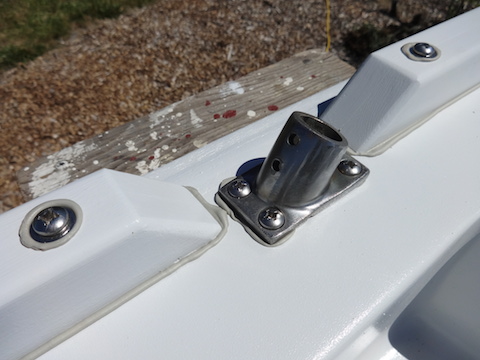
Tape:
Fortunately, we came across a website on bedding deck fittings with butyl tape before we started the outfitting. The two principles outlined on that website are simple. First is to chamfer every deck hole with a chamfer bit. This creates a space around the fastener which the caulk then fills to form a water-tight gasket. Chamfering also helps prevent future gelcoat cracking. The second principle is to use butyl tape instead of caulk from a caulk gun. Butyl tape stays flexible virtually forever, so never becomes brittle. It also provides a water-tight seal without adhering the fitting to the deck, so years down the road when another refit is due, removing the deck fittings isn't a major chore. Compared to other types of caulk, cleanup is a breeze and the cleaned up bits can be reused. We can't imagine ever going back to using another type of caulk.

Chamfering holes in deck
| 
Holes after chamfering
|
Fittings with butyl tape applied, ready to mount.
| 
Butyl squeezes out from fittings after tightening. Removing excess is easy
and not messy. The excess can be re-used. Great stuff.
|
Deck
Work:
When we got her, Minimus had numerous deck leaks around various fittings. After the work described below, right after we finished the last of the deck work, we had unusually heavy rains that dumped over 9" of rain in a week. Not a drop came below and the bilge remained dry as a bone.
We
did a major refit on the boat, starting with the deck. We removed virtually every fitting, including bow and stern pulpits, stanchions, port lights, toe rails, hatches, etc. Some gelcoat cracking in a few areas of the deck suggested possible core rot, though the tapping tests sounded solid. To be sure though, we drilled more than a dozen holes in various parts of the deck and cockpit. To our relief, every hole revealed fresh looking balsa core. There were only a couple very small areas of rot, one where the rudder post goes through the cockpit floor and the other at the deck fitting for filling the water tank. Each was only a few square inches in area and easy to dig out and replace with epoxy putty. Rather than doing cosmetic work on the gelcoat cracks, we re-glassed the deck from the rear of the cabin to the bow with a layer of 4 oz. glass cloth in epoxy resin.
We also covered the companionway hatch, the hatch sheath and the fore hatch with 1/2" MDO covered with 2 coats of epoxy. The hatches, which were initially flexible enough that we avoided standing on them, are now rock-solid.
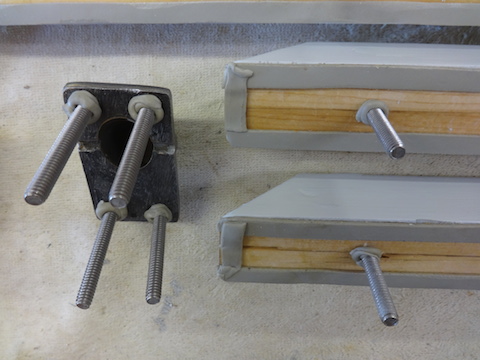
We also built new toe rails from pairs of 1" x 2" boards laminated together to form 2"x 2"'s. The new toe rail is higher and wider than the original and gives much better footing. Also, whereas the original toe rails were just secured with wood screws, the new ones are through-bolted through the deck-to-hull joint, making both the toe rail and the hull-deck joint more secure than they were originally.
(Pearl) In retrospect we feel the toe rails were well worth the time and effort, but this breezy description belies the miserable work of getting washers and nuts on the bolt ends through the narrow gap between the hull and deck liners.
Nearly every horizontal surface, including deck, cockpit and hatches were given a non-skid surface. First we applied a coat of semi-gloss latex paint, then sand was sprinkled on the still wet surface. When that dried, two more coats of latex paint were applied. The surfaces have had lots of foot traffic over the summer and still look like new.

First, we removed all deck hardware and wood work, including
the toe rail.
| 
All hatch covers also came off.
|

Then the endless sanding began, followed by adding a layer of
fiberglass set in epoxy from cockpit to bow.
| 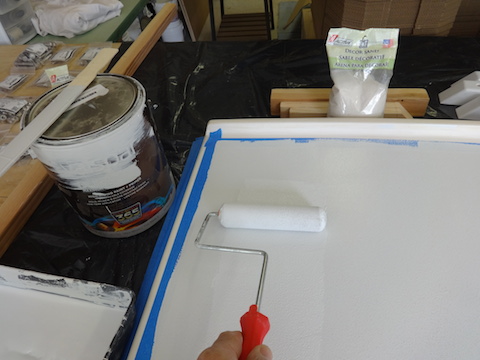
A non-skid surface was applied to most of the horizontal deck surfaces.
First, a coat of paint was applied...
|
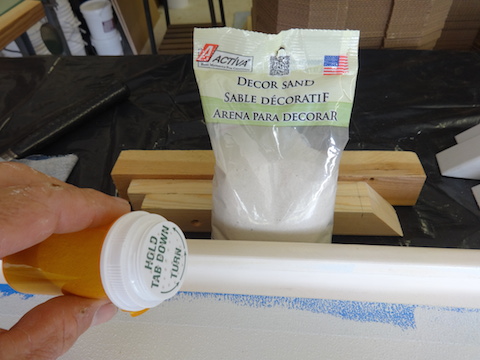
...then sand was sprinkled onto the wet paint.
(The pill bottle has 1/16" holes
drilled in the cap and serves as the "sand shaker.")
After drying, two more coats of paint were applied.
| 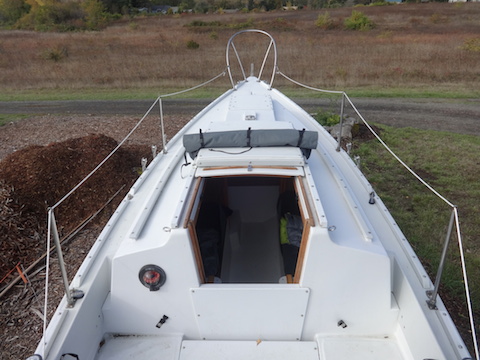
Deck after re-installing hardware and new toe rail.
|

Forward end of cockpit, with upper companionway washboard in place.
The lower washboard is permanently attached and is higher than the cockpit coamings.
The removable upper washboard is stronger and more water tight than ordinary washboards,
to resist waves coming aboard from astern if we should ever have to
lie to the series drogue in heavy weather.
| 
Aft end of cockpit footwell, showing large cockpit drain into lazarette.
|

For offshore sailing, a flaw in many small sailboats is a large cockpit with inadequate drains.
A wave filling the cockpit in heavy weather can dangerously weigh the boat down.
We designed this hinged 'gate' between the cockpit and the lazarette.
It's normally held closed with shock cord, but a wave filling the cockpit will force it open.
The purpose is to allow waves coming into the cockpit to drain quickly into the lazarette
and out through the bottom.
| 
The grate in the bottom of the lazarette has six 2 inch diameter drain holes
to quickly drain the cockpit. The small volume of water remaining in the footwell
will drain through the original
cockpit drains at the front of the footwell.
|
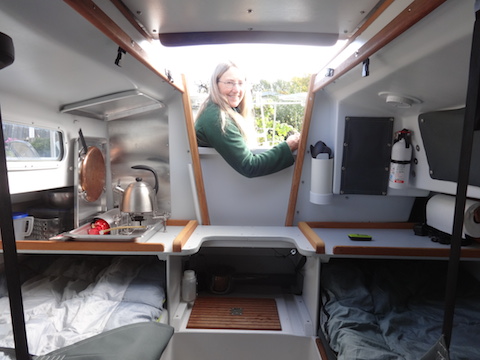
Cabin Work:
The interior of the cabin was a shade of blue we weren't fond of, so we sanded the entire interior surface of the cabin and painted it. Again, the breezy description belies the dust and resulting itchiness, but it didn't take long to do.
Part of the cabin work was installing a counter which serves as a sort of micro-galley. More on than at the Stove
page.
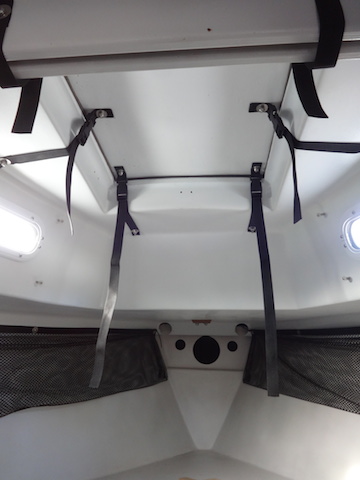
We also cut a couple 8" diameter holes in the v-berth which gives us access to significant new storage space.
Hull Work:
The big job on the hull was the usual task of removing umpteen layers of old bottom paint. It's always an unavoidably miserable job and this was no different. We mostly used Citru-Strip paint remover. We'd put on a thick coat of remover in the morning, then cover it with thin plastic sheeting to prevent drying. 6 to 8 hours later we'd remove the plastic and scrape off the gelatinous mix of remover and paint. After a few days, when the remnants of the remover were totally dry, we sanded any remaining bits of paint that weren't solidly adhered, though we didn't try to get every square inch right down to the original gel coat. Mostly we wanted to closely examine the hull to check for damage hidden under the bottom paint. The hull appeared sound throughout.
The old boot stripe was mostly gone, so we struck a new waterline, employing the usual technique of leveled boards at bow and stern with a string between them.
Another part of the hull work was replacing the rudder post. The original one was badly pitted, as tends to happen to stainless steel that's been under water for long periods of time. We went with stainless steel, with stainless steel straps welded to it. The assembly was then coated with epoxy to prevent contact with salt water. Hopefully it will serve as long as the original one did.
We painted the bottom using an ablative paint, which is the appropriate type for boats that won't be launched immediately.
(Pearl) This description doesn't really give a clue about how odious the process of removing old bottom paint was. We tried several methods of removing the old paint before settling on the method David describes above. At one point we were both out there with screwdrivers in hand, chipping away. For this, it was actually better where the paint was thick, as it seemed one could get a better purchase for popping off a good-sized chip. We tried standard paint remover, and found that it softened the gel coat, making it difficult to avoid going too deeply and causing damaging gouges when scraping off the old paint. David tried sanding, but with so many layers, it was just too slow, not to mention the toxic dust.
The method described above was by far the best of everything we tried. Sometimes
thick layers of old paint would come off in long satisfying strips, and other times only small bits would come off with great effort, but overall, it worked pretty well, and we were able to remove the vast majority of the old paint, right down to the gel coat.
The repainting was also a nasty job, as bottom paint is toxic and off-gases tremendously. Of course the whole process had to be done while the boat sat on its trailer, so we would remove the roller supports on one quarter, remove the paint, and then re-paint that section before replacing the supporting rollers. We both gave a HUGE sigh of relief when the whole process was finally completed. We were also quite grateful that our boat was as small as it is. Funny that we never took any pictures of this process--maybe it was just too odious.
--------------------------------------------------------------------------------------------------------------------------------------------------------------------------------------------------------------------------------------------------------
Post-voyage comments (updated 10-14-2017)
Latex paint:
Latex paint mostly gets a thumbs up. On the interior of the cabin and on
deck it performed very well. The non-skid surfaces on deck where we
sprinkled sand worked great. On the hull, the paint still looked
great after the 3000 mile passage to the Marquesas. Once we were there
however, the rolly anchorages caused the topsides in the 6" or so above the
waterline to be continually wet, which allowed marine growth to form on that
portion of the topside paint. When we tried to scrape or scrub off the
growth, eventually some of the paint came with it.
Next time we'd extend
the bottom paint at least 6" or so above the highest point we expected the
waterline to be when the boat was fully loaded. We saw charter boats in
the Society Islands doing that, presumably for the same reason. We'd also
use gloss, rather than semi-gloss paint on the hull as it's less likely to pick
up stains from oil or other contaminants on the water's surface.
In short, we're still sold on latex paint for its easy application and
cleanup, lack of toxicity and cost.
MDO plywood:
This gets a big thumbs up.
MDO is much less expensive than marine ply and comes with a paint-ready surface
on both sides (we used double-sided MDO). We gave the surfaces, and
especially the edges, a couple coats of epoxy to seal them. There was no need
to fiberglass the MDO as would have been the case with marine ply, or at least
fir ply which is prone to checking. There was no sign of checking
or raised grain on the surfaces of the MDO, even after prolonged weather
exposure.
Butyl tape:
Another big
thumbs up here. In preparation for the voyage, we removed
and rebedded every deck fitting as well as the windows with butyl tape, counter
sinking all fastener holes as described above. We didn't have a single
deck leak despite sometimes torrential rain and occasional green
water over the boat in rough weather.
In
every way, it's an incomparably better caulking system than I've ever used
before. It's cleaner, cheaper, mess-free, the excess squeeze-out is
reusable and it didn't allow a drop of water to come below. We wouldn't
think of using any other caulking method in the future.
Deck work:
Removing and rebedding every deck fitting was a lot
of work, but well worth the effort as there are few things on a boat as annoying
as deck leaks.
We only once had green water in the cockpit, so the
drainage door into the lazarette was never tested. If we had taken serious
water into the cockpit, we'd have been glad that we installed the MDO across the
lower portion of the companionway. We were also glad to have reinforced
the forehatch, companionway hatch and hatch sheath with 1/2" MDO. Standing
on them, they were rock solid, whereas before they flexed considerably.
Cabin:
Our cabin layout worked well and was the
only really practical layout we could have had, given the small space available
in the cabin. There's nothing there we'd do differently next time.
Hull:
The major change here is that we wouldn't use ablative
bottom paint next time. It came off way too easily, no matter how careful
we were when brushing off marine growth using soft pieces of carpet.
We'd much rather have hard bottom paint that we could occasionally scrub the
marine growth off of.
Back to Sailing home page
Back to omick.net home page